How to Create Single Use Amazon Promo Codes
Note: LandingCube now allows you to upload Group (multi-use) promo codes to your campaign as well. Learn how to add codes to your campaign here.
-
Sometimes multi use promo codes get posted on massive deal websites, and someone buys up all your discounted products.
In this article, we’ll guide you through creating single use promo codes on Amazon So you can run discounts without being taken advantage of.
Step-by-Step Guide to Creating Single Use Amazon Promo Codes
- First, login to Seller Central
- From the Advertising menu, click Promotions. (this may be different in Seller Central Europe and India. In this case, go to "Inventory" then "Manage Promotions" or "Promotions".)

3. Then, in the ‘Create a Promotion’ tab, click ‘Create’ under ‘Percentage Off’

4. For ‘Step 1: Conditions’
4a. Keep ‘Buyer Purchases’ set to ‘At least this quantity of items’ and keep the quantity of items at 1.
4b. For ‘Purchased items’ select the product which you want to run the promotion for. If you have problems selecting your products from the "Purchased Items" dropdown, scroll to the bottom of this page for additional instructions.
4c. In the “Buyer gets’ condition, put in the discount percentage you want to offer (Percent off in $ is no longer available). This will vary depending on your goals. Campaigns with higher discounts will likely result in higher conversion rates, although we’ve found that a drop-off occurs after 75%-off. And discounts of 50% + won’t be able to get Verified Purchase reviews.
4d. Leave ‘Applies to’ as ‘Purchased items’ and don’t worry about the Advanced Options.

5. For ‘Step 2: Scheduling’
5a. Choose a Start Date that is at least 4 hours in advance. Keep in mind that the time is set in Pacific time. And you may need to change the date if the current time is past 8:00 pm Pacific.
5b. Choose an End Date that lines up with when you want your promotion to end. Long enough to gain traction, but short enough to provide urgency. Something between 1 and 3 weeks from the Start Date usually works well.
5c. Give the ‘Internal Description’ a name that will help you keep track of the campaign. For example, including the product name & the discount percentage.
5d. Don’t change the Tracking ID

6. Under ‘Step 3: Additional Options’
6a. Beside ‘Claim Code’ select ‘Single-use’
6b. Make sure that the box beside ‘One redemption per customer’ is checked.
6c. For ‘Claim Code Combinability’ select ‘Preferential’

7. Then click, ‘Review’.
8. Double-check that the promotion is set up as you want it.
8a. ‘At least this quantity of items’ is 1
8b. Buyer gets the ‘Percent off’ that you planned to offer.
8c. Claim Code is ‘Single-use claim code required.’
8d. ‘One redemption per customer’ is ‘Yes.’
9. Click ‘Submit’ and a message that reads ‘Your promotion has been created’ should appear.
10. Then click ‘View or modify your promotion.’

11 . Next, click ‘Manage claim codes’

12. Then enter a Group Name. Use the same name you used for the Internal Description.
13. Enter the number of codes you wish to create. It should be enough to last the duration of your campaign.

14. Click ‘Create’ and the claim code group will begin processing.
15. Wait until the Status changes from ‘In Progress’ to ‘Ready’ and then click ‘Download’

16. If the Downloaded file is in .zip form, open and unzip it.
17. Otherwise, upload the file into your coupon delivery tool or save the file in a location you will remember for use later.
Automatically deliver single-use promotion codes
Single-use promo codes are awesome, because they prevent one person from hogging up all your discounted items.
But some Amazon sellers spend hours every week manually emailing single-use promo codes.
Luckily, LandingCube automates the process of sending single-use Amazon promo codes. When a customer reaches your Amazon landing page and enters their email for the promo code, LandingCube will automatically send them a single-use promo code. And our tool is the industry leader in reliably delivering these promo codes!
How to Upload Promo Codes into Your Amazon Landing Page.
- First, make sure when creating a new campaign you choose ‘Promo Page.’

2. Choose a start date & end date that matches the timeframe of the promotion you made in Amazon Seller Central
3. Build your landing page – fill in the Basics, craft your Design, and make sure to integrate your Email Service Provider. Then you’ll click Save & Continue to reach the Publish section.
4. On the Publish section of the landing page creator, simply upload the Promo Codes file you downloaded from Amazon. Click the ‘Choose File’ button and select the given file.

Please Note: that one campaign can only have one type of code. Meaning, if you create a campaign with a Group code, you can't later upload a batch of Single-Use codes to the same campaign. You'll need to create a fresh campaign.
5. If you want to limit how many promo codes can be given out per day, turn on the ‘Daily promo code limit.’
And that’s it.
We designed this Amazon landing page generator to make it as easy as possible to distribute single-use Amazon promo codes. All you need is your Amazon listing’s URL and the file of promo codes (which you just learned how to create). So you can grow your business by driving external traffic to Amazon - run promotions, boost your Amazon sales and build email lists.
If you have problems selecting your products from the "Purchased Items" dropdown, please follow the guide below.
Does the "Purchased Items" row have a "Create a new product selection" text option ?

If so, choose “Create a new product selection” at the end of the “Purchased Items” line. This will allow you to choose which products will be discounted. The next page should look like this:
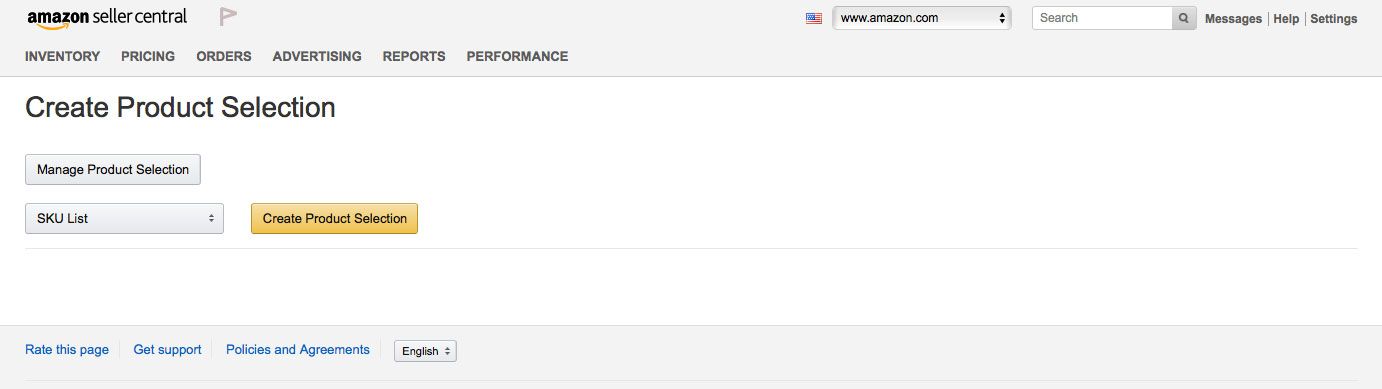
From the drop-down menu, choose “SKU list”, then click on “Create Product Selection”. Now you can begin to tell Amazon which products to discount.
On the “Create Product Selection” page, enter the Product Selection Name or Tracking ID for your product, include an internal description for your own use, then enter the SKU number (or numbers) which are attached to the product you wish to discount. (Don’t forget that you can find your SKU in the “Manage Inventory” section of your Seller Central Account.) Once you’ve chosen the SKUs, click on Submit.
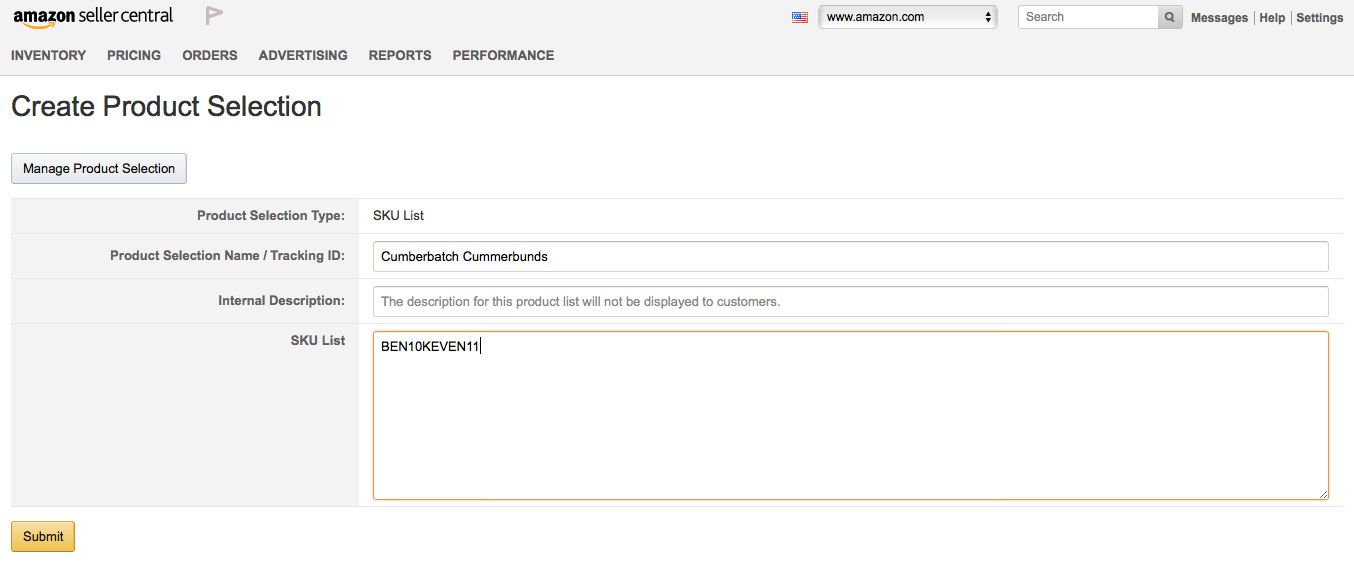
Once you’ve submitted the SKUs, you will be taken back to the first "Create a Promotion: Percentage Off" page. Now in the “Purchased Items” drop down menu you should choose the Product you just named.